How to enable MacFuse/PCloud Drive on Mac Sonoma 14.2.1
I recently upgraded to Mac Sonoma 14.2.1 and MacFuse stopped loading which affected my ability to load PCloud and NTFS drives. I spent a few days trying to troubleshoot everything and in the end it turned out I had to disable Mac System Integrity Protection to get everything to load. I’m sharing in case it helps anyone else.
To disable SIP on your Mac Sonoma for extensions like MacFuse and pCloud Drive:
- Shut down your Mac: Turn off your Mac completely by pressing and holding the power button until the screen goes black.
- Restart in Recovery Mode: Enabling Recovery Mode depends on your Mac. You can try the steps below or follow Apple’s guide here.
Power on your Mac and immediately press and hold Command (⌘) + R to enter Recovery Mode.
Power on your Mac and hold the power button down until Other Options displays. - Open Terminal: In Recovery Mode, select “Utilities” in the macOS Utilities window and select “Terminal.”
- Disable SIP: Type
csrutil disablein Terminal and press Enter. This disables System Integrity Protection (SIP). - Restart Mac: Click the Apple menu and select “Restart” to reboot your Mac with SIP disabled.
- Re-enable SIP (if needed): Follow the same steps but use
csrutil enablein Terminal to re-enable SIP.
Note: Disabling SIP poses security risks. Re-enable it once you’ve installed the necessary extensions. Only disable SIP when necessary and understand the potential risks involved.
How to Delete a Row in Excel Using the Elgato Stream Deck
Recently I was working on a massive Excel Spreadsheet and needed to manually review each entry and clean up rows that were no longer needed. The Elgato Stream Deck came in handy for a quick shortcut so I thought I’d share it in case anyone else can use it.
I took this opportunity to practice creating the first of what I hope are many training videos. This took me around 30 minutes to do from start to finish as I had to learn the video editing software including how to record, how to split and edit, and how to add text overlays. Hopefully the next videos will be faster but it was a fun exercise and I hope someone else finds it useful.
How to Delete Folder with Special Character in Windows 10/11
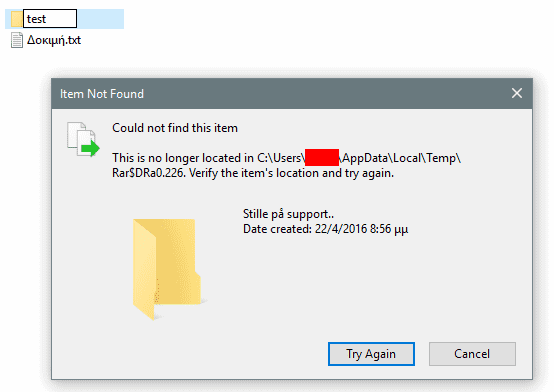
I ran into an issue where a folder was created by some application with a special Unicode character that Windows Explorer doesn’t seem to play nicely with. I also was unable to tell what the character was since nothing would reveal it. The folder’s there, but you can’t rename or delete it. If I tried to remove or delete it, I’d get an error saying the folder doesn’t exist:
I have LockHunter installed but it wasn’t able to delete it for some reason. The easiest way I found to delete the folder was to use Git Bash and then use the appropriate commands to rename or delete the folder.
Browse to the folder where the offending folder is located. For example purposes, I’ll use c:\temp\folder1
cd c:/tempRename:
mv fol (hit tab to autocomplete) folder1Delete:
del fol (hit tab to autocomplete)If you don’t have Git Bash or are not a developer/power user, you can download the portable version from https://git-scm.com/download/win to use temporarily. Once you decompress the files to a folder, you’ll find git-bash.exe which you can double-click to run and use the above commands.
Add GTM to Gatsby using Helmet
One of my devs needed to add Google Tag Manager (GTM) to an older Gatsby project we built and he was running into issues implementing the GTM code provided by Google since the react-google-tag-manager package required a newer version of Gatsby and its dependencies.
The issue turned out to be that the strings needed to be escaped for Helmet/React to process it correctly. If you’re using an older version of Gatsby, the snippet below should help you add GTM and call your events as needed. Just add it to your main template file.
const googleAnalyticsId = 'your-google-id-here'

<Helmet>
      <script async src={`https://www.googletagmanager.com/gtag/js?id=${googleAnalyticsId}`}></script>
      <script>
        {`
          window.dataLayer = window.dataLayer || [];
          function gtag(){dataLayer.push(arguments);}
          gtag('js', new Date());
          gtag('config', "${googleAnalyticsId}");
        `}
      </script>
</Helmet>How to Clear Archive & Read-only flags on Files in Windows in Bulk
I ran into an issue where I had to move files from one system to another and was running into issues because files had been set as read-only, had the archive flag set, or both. It was causing the system to skip files which wasn’t acceptable. Normally you could just use Windows to clear it in bulk, but that could potentially mess up file permissions. I needed a way to automatically just clear all flags but respect permissions.
I did some searching and didn’t find a utility that would do the job and most of the solutions I found required Powershell which wasn’t available on the system I was on. I ended up writing a quick console application in C# to do the trick. I’ve made it free and open sourced it in case anyone wants to use it.
If you need just the app, you can find the release build here with instructions. The app also prompts for input to make things a bit easier to use. There’s no install, no tracking or metrics, or anything else related to privacy concerns in this app. It’s a simple throwaway utility to get the job done and move on.
https://github.com/gregvarghese/clearflags/releases/tag/1.0.0
If you want to see the source code, that is available here:
https://github.com/gregvarghese/clearflags/
Please note that I did this in about 10 minutes for my own use so error handling is pretty much non-existent. I mention this because I did run into one issue where Windows was somehow seeing a folder with files in it as a file and it couldn’t be deleted or renamed and the utility couldn’t get past it until it was resolved. I didn’t spend much time debugging and just used my Mac to rename the folder and Windows was able to recognize it after the change, so the utility was able to continue processing.
How to fix VMWare Fusion Pro 10 “Cannot find a valid peer process to connect to”
I recently got a new mac and was migrating a VMWare Windows Virtual Machine from my other computer. When starting the virtual machine, I received a random message from VMWare Fusion saying “Cannot find a valid peer process to connect to.”
The fix was rather simple as it was just Apple blocking VMWare from running. To fix it, follow these steps:
- Open System Preferences by searching in Spotlight or clicking the gear icon in the dock.
- On the top row there is an icon for Security and Privacy – Click that icon
- Near the bottom of the screen that appears the following statement
“System software from developer “VMWare, Inc.” was blocked from loading” - Click Allow
How to Fix ‘Converter Failed to Save File’ with Excel 2016
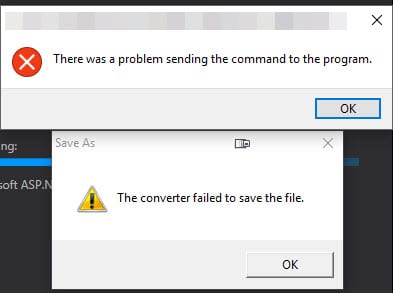
I recently upgraded to Office 2016 on my Windows 10 desktop and was getting the error “Converter failed to save file” when double clicking on the file along with an “There was a problem sending the command to the program error” every time. I finally had enough with the annoyance to troubleshoot it and figured out a solve.
If you have the same issue, here’s how to fix it:
- Open your Default Programs configuration from the Control Panel. On Windows 10, you can hit start, type Default Programs, and it’ll open the app.
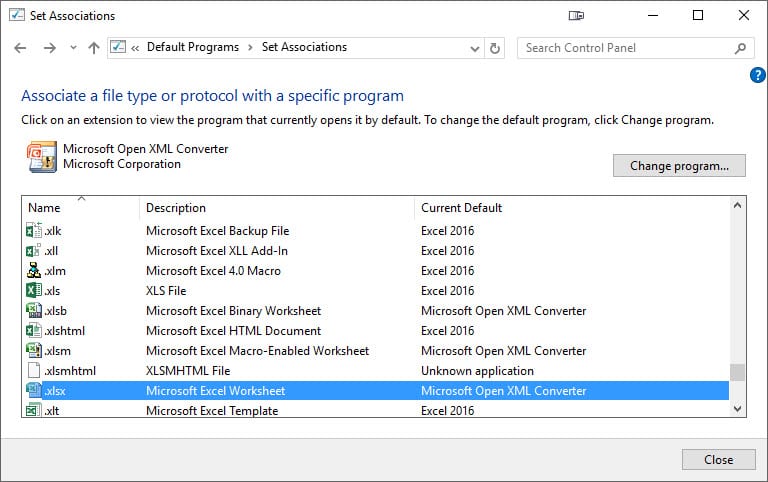
- Scroll down the list until you get to the Excel formats (XLS):
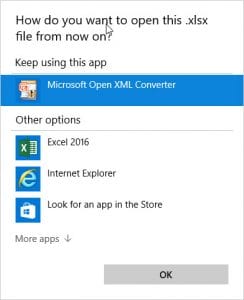
- If you see anything other than Excel as the default, you’ll need to change the default to Excel. For me, the issue was the Open XML Converter not being installed anymore after upgrading to 2016. To change the default, select the format, click the “Change Program” button and select Excel 2016 from the list of apps that pops up and click OK to set the association:
- You’ll need to do this for each format in the list to correct it. The most common formats you’ll use are XLS, XLSX, & XLT.
How to test email sending in Laravel 5.3 using artisan tinker
I’m building a Laravel app and ran into an error when trying to send mail but wasn’t getting an error back since the request was posted through ajax. If you’re trying to troubleshoot it, artisan tinker app is very useful to get more information on the error.
Fire up terminal/command line and run:
php artisan tinkerand then run the following snippet:
\Mail::raw('hello world', function($message) {
   $message->subject('Testing email')->to('test@example.org');
});
You should either see a success/null message if everything was correct, or an error with details on what went wrong.
The error I encountered required configuring 2FA in Gmail or you can choose setting the insecure app option up to send through Gmail for testing.
(98)Address already in use: AH00072: make_sock: could not bind to address [::]:80 – error
I recently got handed a new Ubuntu droplet at work to setup and work on. I was going through the typical configuration to lock down the server and go to installing Apache when I suddenly ran into the error
(98)Address already in use: AH00072: make_sock: could not bind to address [::]:80 – error
I was a little surprised considering I had only run 4 commands total on a brand new installation. If you’re getting this error like me, you’ll need to find out what’s being bound to port 80 and then stop it. Use this command to get a list of anything that’s running on port 80.
sudo lsof -i:80
For me, it turned out nginx was running and bound to port 80. If you have the same problem, run this command to stop it:
sudo service nginx stop
Now you should be able to start apache.
How to Copy and Paste into the Digital Ocean VNC Console
I recently signed up for Digital Ocean to test droplets for my development and linux management testing. I was securing the server and setup fail2ban, disabled the root login, and created a user account but forgot to change the user name from root to the user name I selected in my SSH client profile. I ended up locking myself out of the server and had to resort to logging into the admin panel on Digital Ocean’s website and use their browser embedded VNC client to restore my access. I quickly discovered that one of the downsides of using this panel is that you can’t copy and paste commands. Luckily there’s a workaround and you can use the browser console to do sendkeys through Javascript.
Bring up the console in the browser developer tools. Here’s a cheat sheet for keyboard shortcuts:
| Browser | Description | Windows | Mac |
|---|---|---|---|
| Chrome | Open Developer Tools and bring focus to the console | Ctrl + Shift + J | Cmd + Opt + J |
| Firefox | Open Console | Ctrl + Shift + K | Cmd + Opt + K |
| Internet Explorer | After hitting F12, you have to click the console tab. There’s no direct shortcut to the console tab. | F12 | N/A |
!function(){function t(){window.rfb.sendKey(e.shift().charCodeAt()),e.length>0&&setTimeout(t,10)}var e=prompt("Enter text to be sent to console").split("");t()}();
Update 9-21-16
Ruden and Sebastiaan’s pointed out there was a bug in the code above. This updated snippet has support for characters when using shift characters like !@#$%^&*()_+
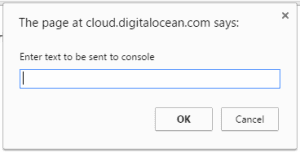
!function(){function t(){function n(t,e){s=s.concat(RFB.messages.keyEvent(t,e))}var o=e.shift(),s=[],i=o.charCodeAt(),c=-1!=='!@#$%^&*()_+{}:"<>?~|'.indexOf(o),r=XK_Shift_L;c&&n(r,1),n(i,1),n(i,0),c&&n(r,0),rfb._sock.send(s),e.length>0&&setTimeout(t,10)}var e=prompt("Enter text to be sent to console").split("");t()}();You’ll receive a dialog prompt to enter the copy to paste in. Please note that you need to click on the VNC console and hit enter to execute the command.
If you need to enter more than one command, just hit the up arrow on your keyboard in the console to get the script again for easy reuse.

